Monday 6 June 2016

Moving onto dressmaking

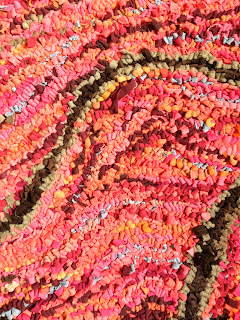
Over two years ago I stopped making rag rugs, pretty well, because it hurts my hand. The big pink and brown wavy rug, I am heartily proud of it - it is on a round table in my bedroom, the little table we keep photos of our kids on. But I haven't done anything much since then. The bodger used for rag rugs in particular gave me RSI. The speed shuttle was fine, though. I may one day set up my frame and do another rag rug but for now I am focussing on dressmaking and I am getting myself in gear for quilting too!
I also lost interest in a lot of things like blogging when my father died in November 2013. When he collapsed in his bathroom and my mother was trying to call me, to my eternal shame I was out of touch collecting a sewing cabinet from an Ebay seller in Wiltshire. Since then I have upgraded to a bigger sewing cabinet, installed a table for cutting out on, and taken over my mother's Janome machine which is less than 10 years old and a bit superior to my old John Lewis machine.
I have now made quite a lot of clothes, mostly very simple Sewaholic tops - 3 Oakridge blouses, no fewer than 5 - FIVE!!  Renfrew tops with cowl necks which I love to bits and wear all the time!
Today I finished off a really smart classic dress using Simplicity 1586, an "Amazing Fit" pattern. I used size 16, C cup and Curvy fit pieces and added six inches to the skirt length, which was otherwise just above the knee.
I am completely thrilled with the dress and have been posting photos of it on all the sites I subscribe to - Pattern Review, the Sewing Forum, London Dressmakers Club, hoping to garner compliments. Here I am looking very smug. Photo by Aggie. (Sewage pipe by Roman Lake Ltd, installed for their personal toilet on the building site which used to be our garden.)
As well as the good fit round the hips I am pleased with the neckline and I put this down to the fact that I staystitched the neckline AND armholes. I also took a bit of trouble finishing off the seam allowances with my serger, because this lightweight grey suiting is very fray-ish. 
Here are some other things I've been making:
First, a jacket made last Christmas which started out as a shirtdress. The stretch cotton twill was too heavy for a dress, and it dawned on me I don't even like shirtdresses so with the help of a lovely sewing teacher in Ealing I shortened it to a jolly, flowery hip-length jacket. Wore it to parties last Christmas.
Everything has been for me, except I made a simple little pinafore in navy corduroy for Edith. She wants a gypsy blouse but hasn't got round to giving me the fabric she bought for it yet.
I haven't felt I am getting better at dressmaking but when I look at that grey dress and compare it with the thing I made a year ago, which was another Amazing Fit pattern, I think I might have got a bit better.
And compare this monstrosity I made back in 2013 

With this Oakridge blouse I knocked up very quickly for a smart occasion the other day...
I think my fabric choice and pattern placing skills are improving. 
I have some nicer labels now to sew into items I am proud of:
This label is sewn into my proudest achievement so far - a Janet Pray Jacket Express in a lightweight cotton twill. Like the grey suiting I bought this fabric on spec at the London Sewing and Knitting Show in Olympia two years ago. It's so cute and I am so proud of the jacket as it is by far the most complicated garment I have ever sewn in 42 years of sewing! It deserves a blog post of its own. As does my serger....Later perhaps. 


Monday 20 May 2013

THE BIG PINK AND ORANGE AND BROWN WAVY LINE RUG IS ACTUALLY FINISHED!!!!!!!!!!!!!!!!!!!!!!!!!

Here is a selection of photos I have taken over the past 12 months - it is nearly 12 months - since I started it. This is an early view of the front. I worked the brown lines first and used them as guides for the other colours. I have used a speed shuttle as supplied by Jenni Stuart Anderson, and an excellent adjustable wooden frame -  an "Easifix frame" made by Christine and Eddie Birch of Farmhouse Frames (tel 01492 640881). (The canvas being in front of a window was helpful). The frame is brilliant - it allows you to see an exceptionally large area of canvas at one time and is also easy to dismantle and reassemble when you need to move the canvas along. I notice other ruggers whip their canvas to the sides of the frame as well. I haven't done that and I admit my rug is not a perfect oblong, but you know? Sometimes life is too short. Though "Life is too short" would be a disastrous motto for anyone addicted to rag-rug making...

The first corner, with tags. (I've got several of these photos up already, I'm just putting them all here in one place for convenience)

Here you can see how the pink and white printed cotton jersey fabric just doesn't really work out...

A detail of the finished rug before I had pulled out all the pink printed strips and the pale grey strips and replaced them. The picture below shows what the rug looked like after I had done that, which was tiresome, but I'm really glad I did it - otherwise the ship would have been spoiled for a ha'porth of tar. (The colour is a bit odd, this happens when I take photos with my phone in various lights)

This shows you what I have done on the back. After poking all ends to the front (using a bodger) and trimming the whole rug, I ironed fusible interfacing to the whole back surface. I trimmed the allowance round the edges of the canvas to roughly the same all round, 2-3 inches, and glued it down with Everbuild Stick2 Instant Spray Contact Adhesive All Purpose High Strength Bond. It is a very easy to apply spray. I considered latex but decided against it, on the grounds that our climate is essentially damp and latex backing does not breathe well. 
Then I pinned, basted and sewed strong petersham binding to a piece of canvas cut to size, a couple of inches shorter and wider than the finished rug size. That's the zigzag line you can see on this picture. I didn't bother to use co-ordinating yarn, I just used what was on my sewing machine. Then I glued this backing canvas piece to the back of my rug: first I rolled it into a sausage, then unrolled it gluing it down a few inches at a time, stamping it down with my knees as I went along. This was fun. 
Lastly I whipstitched the petersham binding to keep it all together. There are a few daggy bits of thread on the back and some of my basting thread won't come out because I didn't bother to pull out the basting thread before using the GLUE, soddit! This final bit of sewing hurt. It was tough on my hands, my fingers got very sore on the canvas and I was quite bad tempered with Dan when he asked if I was going to bed yet. 
Feeling very smug today so I have ironed one of my little labels to the back:


Below is the FINISHED ARTICLE. 
One handmade hooked rag rug. 
Size: 87x67cm. 
Materials: hessian canvas and recycled cotton textiles. 
I am WELL PLEASED. Now what do I do with it?


PS I have turned part of our top floor landing into my sewing area. This is the first time I've ever had a dedicated sewing space. For sewing to be enjoyable, it helps if there is a place you can retreat to for a few minutes at a time without worrying about tidying up and such.


Monday 6 May 2013


I've done it! Well, apart from the backing and binding. I can't believe I've actually finished this enormous rug. Not enormous really of course - it is 122cm by 85 cm - but large by rag rug standards.
What have I learned from this project?
1. To persevere, doing a little at a time but very regularly. Otherwise it sits doing nothing for weeks and makes me feel guilty. The "little at a time" habit requires a dedicated work space which does not need to be cleared out of sight from day to day. I think I could have done this rug within 3 months if I had done a little every day.
2. To neaten as I go. At first I couldn't be bothered to tuck the strip ends towards the front at all because I was so enamoured of the wonderful power rush the speed shuttle gives me. This meant they dangled down over the canvas and annoyed me as I was working. So then I started tucking them back, though not all of them. So when I had finished the whole rug I had to go over it all again tucking all the threads to the front. Then I had to go over it all again snipping the ends level. Doing one job across a large rug is boring and physically something of a strain - I am getting a bit of pain in my right hand that doesn't respond well to repeated actions. Better to tidy up as you go along.
3. To decide early on that a particular colour isn't working, rather than carrying on using it thinking I might get used to it. When I had come to the end of the rug I realised that the light grey ribbed cotton jersey and the pink and white printed jersey didn't work and I had to go back and take all of it out.

So - I feel really proud of the rug but it's been a learning process too. What I haven't mentioned is that I just love the way it looks. This photo does not do it justice: in real life, it looks positively alive.

Wavy pink and orange and brown rag rug nearly finished!


The wavy pink/orange/brown rug is almost completely done. I can't understand why it's taken me this long - I just stopped working on it for a while I think. I certainly took a break from rag rugging when we got Merlin the magical cockapoo.
I am currently working to eliminate the pale grey and light stripy fabric strips which don't sit well with the other colours. This means pulling out about 100 strips and replacing them one by one. In this photo you can see several of the pale grey strips (from a ribbed top of mine) and pink and white printed jersey strips (from something donated). They don't work, they are too pale and the printed jersey is worst as it's hard to keep the printed side facing outwards. No more prints for me, not for my rugs anyway! I used some wigwam yarn here and there, as my colours started getting too samey.


I haven't actually used up all the canvas I marked out for this rug as I felt I was getting a bit bored, it was big enough for a decent hearthrug and anyway my stock of strips was starting to get a little low. (Hence the purchase of wigwam yarn.)
I still have a lot of the brown strips left however, as I used these sparingly to create the wavy section dividers.
My next plan in the rag rugging department is to make cushion covers, probably using linen and that amazing wigwam yarn which I used a bit on this rug.
And my other big project is to get back into dressmaking, inspired by my daughter Edith who was fired up by the Great British Sewing Bee programme to get me to teach her to sew. The trouble with sewing is it takes so much time to get everything out and set up and then put it all away again when you need the sitting room to look tidy, so I plan to turn the top landing into a functioning space again, a real sewing room.
I've bought an overlocker on Ebay!


Monday 13 August 2012

Update on my mother's rug

Progress has been slow not because the work is difficult but because I would rather be watching the Olympics than in my bedroom rag rugging. I never imagined I would write that!
Looking at the rug this way up, the worked area measures 87cm along the left-hand edge and 67cm along the bottom edge. The ends of fabric strips hanging out are nothing to worry about - they will all be trimmed back later. You can see quite a difference in tidyness between the left-hand part which has been already trimmed and the more recently worked area to the right.

Friday 8 June 2012

It just keeps getting wavier

Those last pictures were terrible! I took them in the evening under electric light. Never again!

Monday 28 May 2012

Wavy Cynthia rug so far

Loving my speed shuttle. It is a living thing.
The canvas, too, becomes alive after a few square inches have been hooked; a tension is developed which was not there before.
These pix show back and front. A lot of ends to be trimmed.