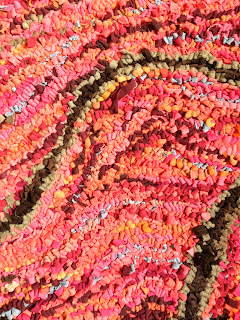
Here is a selection of photos I have taken over the past 12 months - it is nearly 12 months - since I started it. This is an early view of the front. I worked the brown lines first and used them as guides for the other colours. I have used a speed shuttle as supplied by Jenni Stuart Anderson, and an excellent adjustable wooden frame - an "Easifix frame" made by Christine and Eddie Birch of Farmhouse Frames (tel 01492 640881). (The canvas being in front of a window was helpful). The frame is brilliant - it allows you to see an exceptionally large area of canvas at one time and is also easy to dismantle and reassemble when you need to move the canvas along. I notice other ruggers whip their canvas to the sides of the frame as well. I haven't done that and I admit my rug is not a perfect oblong, but you know? Sometimes life is too short. Though "Life is too short" would be a disastrous motto for anyone addicted to rag-rug making...

 The first corner, with tags. (I've got several of these photos up already, I'm just putting them all here in one place for convenience)
Here you can see how the pink and white printed cotton jersey fabric just doesn't really work out...

 A detail of the finished rug before I had pulled out all the pink printed strips and the pale grey strips and replaced them. The picture below shows what the rug looked like after I had done that, which was tiresome, but I'm really glad I did it - otherwise the ship would have been spoiled for a ha'porth of tar. (The colour is a bit odd, this happens when I take photos with my phone in various lights)
 This shows you what I have done on the back. After poking all ends to the front (using a bodger) and trimming the whole rug, I ironed fusible interfacing to the whole back surface. I trimmed the allowance round the edges of the canvas to roughly the same all round, 2-3 inches, and glued it down with Everbuild Stick2 Instant Spray Contact Adhesive All Purpose High Strength Bond. It is a very easy to apply spray. I considered latex but decided against it, on the grounds that our climate is essentially damp and latex backing does not breathe well.
Then I pinned, basted and sewed strong petersham binding to a piece of canvas cut to size, a couple of inches shorter and wider than the finished rug size. That's the zigzag line you can see on this picture. I didn't bother to use co-ordinating yarn, I just used what was on my sewing machine. Then I glued this backing canvas piece to the back of my rug: first I rolled it into a sausage, then unrolled it gluing it down a few inches at a time, stamping it down with my knees as I went along. This was fun.
Lastly I whipstitched the petersham binding to keep it all together. There are a few daggy bits of thread on the back and some of my basting thread won't come out because I didn't bother to pull out the basting thread before using the GLUE, soddit! This final bit of sewing hurt. It was tough on my hands, my fingers got very sore on the canvas and I was quite bad tempered with Dan when he asked if I was going to bed yet.
Feeling very smug today so I have ironed one of my little labels to the back:
Below is the FINISHED ARTICLE.
One handmade hooked rag rug.
Size: 87x67cm.
Materials: hessian canvas and recycled cotton textiles.
I am WELL PLEASED. Now what do I do with it?
PS I have turned part of our top floor landing into my sewing area. This is the first time I've ever had a dedicated sewing space. For sewing to be enjoyable, it helps if there is a place you can retreat to for a few minutes at a time without worrying about tidying up and such.


.jpg)

.JPG)